Remote tutoring with video chat software like Zoom, Skype, and Google Meet is a natural fit for Piqosity’s adaptive practice platform for ISEE Upper Level, ISEE Lower Level, ACT, and SAT. With no bulky books and scattered papers to worry about, Piqosity and video chat software enable tutors to efficiently work with students without geographic restrictions.
The outbreak of the global COVID-19 pandemic during the 2019-2020 academic year has significantly increased the importance of online tutoring and teaching. We’re updating this article as we revisit our old favorites and learn about new tools in the educator’s arsenal to enable students to keep calm and carry on learning during this crisis.
Getting Started with Remote Tutoring
For remote tutoring, you have to use technology to bring you together with your student; otherwise, in-person tutoring best practices still apply.
If you were meeting with a student in person, you’d probably sit next to them, open up a book or a website, and work through material together.
For remote tutoring, you sit next to your student using video chat software, open up a website using screen sharing, and work together using a whiteboard app.
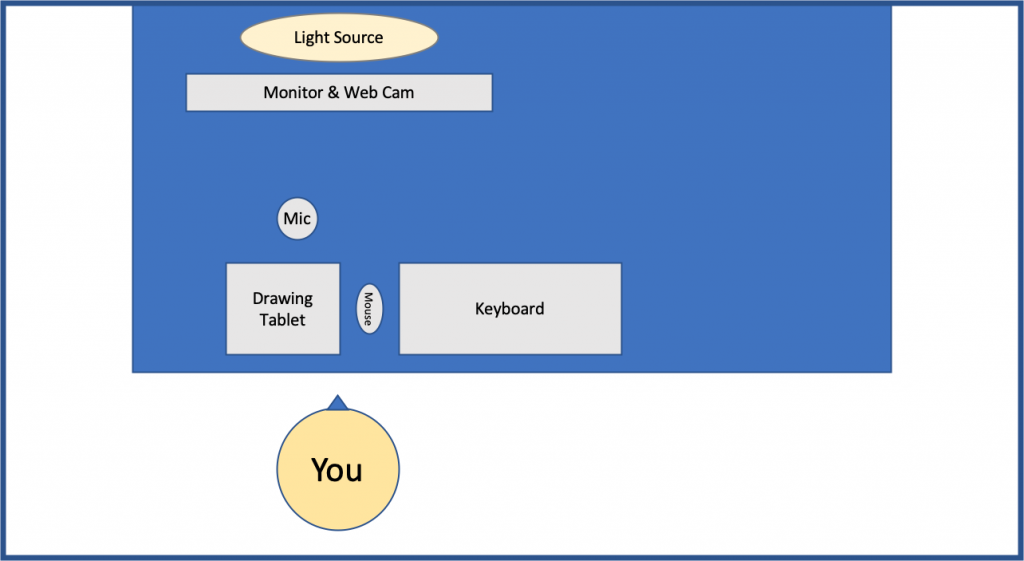
Recommended Devices and Apps
- A computer with webcam for video-conferencing and screen sharing AND
- A tablet with stylus for drawing on as a whiteboard (must have for math tutoring)
- (For Pros) USB Microphone and Diffused Light Source
We recommend using two devices in tandem. This is because it’s much easier to split duties between two screens; one screen for chatting with your student and co-browsing with, and the other screen to write on.
If you want get the best gear, we recommend a big-screen tablet designed to work with a digital pencil like an Apple iPad or Microsoft Surface tablet.
 We think the iPad with an Apple Pencil is the best tablet to get. We also have Windows, Android, and Fire tablets, but they’re just not as well-suited to remote tutoring. Windows is great at being a desktop in tablet form especially if you have only one device; Android is super on phones, and Fire tablets are a steal given their low price. But the iPad is the best all-around tablet and the entry-level version regularly goes on sale for $250 or less.
Look Like a Pro
If you really want to look professional, then you should make a small investment in good video, sound, and lighting.
For video, a web camera that is at least 1080p is considered “high definition” and usually the maximum quality that most streaming services can handle (most laptop webcams are only 720p).
Yes, 4k is even better, but most meeting software won’t actually broadcast at that level of detail because it uses too much bandwidth. But to future proof yourself, we recommend the Logitech Brio ($200) or just use the main camera on your smartphone.
But the biggest improvement you can do for video quality is just to make sure that you have sufficient light and that it is coming from the right direction–behind your camera and pointing at your face. For example, try to avoid sitting in front of a window as the bright light will wash out your face and make you appear too dark.
If a camera-facing window cannot be avoided, then compensate by placing a bright light behind the camera focused on your face. Note that the light does not have to be pointed right at your face; it could be reflecting against a wall to prevent blinding you. A diffused light source like an LED ring light might be a good, cheap investment.
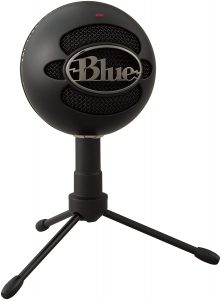
For sound, a good USB microphone like a Blue Snowball ($50) will make a noticeable difference to a listener and will be like the difference between analog and HD. Position the microphone within a foot of your mouth to ensure that your voice comes through clearly and external noises are muffled.
Get a Drawing Tablet
 Touch-sensitive drawing pads like the Wacom Intuos ($80) or Huion Inspiroy H640p ($40) are even more affordable still and don’t require a separate power connection. These screen-less drawing pads used to be particularly ubiquitous in the creative community until touch-screen tablets and computers started to erode their market.
The pandemic-induced need for affordable, remote-tutoring has brought new prominence to the old-school drawing pads, which has led to stock sell-outs. These drawing tablets are basically a stylus-mouse. While you’ll probably get used to it, it is a little odd not seeing what you’re drawing directly underneath your stylus; it’s a little bit like re-learning, “mouse skills” from elementary school.
An advantage with using a drawing tablet is that you could use just one piece of software that integrates both a whiteboard and video-conferencing features in one package like Zoom. However, the disadvantage is that you will often lose out on more advanced features that come with a dedicated app for tablet-optimized whiteboard as with Google Jamboard’s iOS app.
Skype and Google Jamboard
For most users, we think that using Skype on a computer for video chat and screen sharing in tandem with Google Jamboard on a tablet is the best solution at this time. Both Skype and Jamboard are free, well-established, and widely accessible.
However for users with high-end hardware or who are heavily invested in Google or Apple, below we also summarize our findings for Google Hangouts and Apple Facetime plus two other whiteboard solutions.
Remote Tutoring Tips Checklist
Before Tutoring Session
To maximize your productive time during a tutoring session, you should take a few steps to ensure that your technology works. If possible, also make sure your student has the right set up before the session begins.
- Set up your gear in a quiet place free from visual distractions; boisterous cafes and dorm rooms shared with unpredictable roommates and their guests are not recommended
- Create a video chat account or ensure that you can log-in to an existing account
- Check that your microphone, speakers/headphones, and web cam work
- Add the students to your list of contacts in the web conference software
- In your web browser or app, open up a new whiteboard
- Ensure comfort with the whiteboard tools like pen types, erasing, and adding photos
- Find the whiteboard URL to share with your student
- Ensure that your computer desktop is free of items you don’t want your student to see
- Prepare your digital learning content
- Log into the Piqosity/ learning content you’ll want to go over
- Ensure that images you want to upload to the whiteboard are easy for you to access
During Tutoring Session
For remote tutoring, it’s even more important that you keep your student active and engaged.
- Start a video chat session with the student
- Share your screen with your student in the video chat window (we recommend sharing only a single application window to reduce the chance of students seeing something you don’t want them to see)
- Send the whiteboard URL to the student in the video chat window
- Ensure that the student is doing the majority of the touching, tapping, and typing
- When referencing material on the screen, remember to mark it or draw it on the screen or whiteboard as students won’t be able to see your finger pointing to something offline
After Tutoring Session
After your session is over, avoid “hot mic” problems by ensuring your video chat and whiteboard are closed properly. Document your lesson and ensure that your student was happy with the session.
- Ensure that you end the video chat and close the shared whiteboard; closing windows and quitting the software is best
- Ask the student or parent for feedback on the session
- Document what information you covered during the session in writing
- Don’t bill for time that was related to technical difficulties
Whiteboard Software Reviews
 Virtual conference software makes it so that you can see and talk to your student and even view on-screen content with them. However, most tutors will probably still want whiteboard software in order to work through problems together with their students.
- Google Jamboard is part of the G-suite of apps and is freely available to anyone with a Google Account. While basic functions work on a Mac or Windows computer, it works best with the dedicated iOS or Android app. When using the app, the most unique feature is the “assistive drawing,” which automatically suggests shapes and diagrams without having to manually select them. You can also create multiple boards and save them for viewing later.
- Whiteboard Fox is free, doesn’t require a user account, and is clutter-free. Its clutter-free design means that it works well on small screens like Amazon’s 7″ and 8″ tablets. You can easily invite your students with a URL, and you can upload pictures to draw on.
- AWW App looks a little snazzier than Whiteboard Fox and is also free and doesn’t require a username. However, unlike Whiteboard Fox, it’s design is a little bit more cluttered meaning that it doesn’t work as well on small screen tablets and phones. Additionally, during our testing there was some noticeable lag between when we wrote on one device and when it showed up on screen.
- Ziteboard features a clean design but requires that the tutor have a username and password. Additionally, Ziteboard can be confusing when one user is on a small screen tablet and the other user is on a desktop. Because there are no clear boundaries of the board, the small screen user might not notice that the big screen user is drawing at all because it’s outside of the user’s view. However, the actual process of writing looks a little smoother and snazzier than Whiteboard Fox; the digital ink looks more like its analog predecessor.
Video Conferencing Software Reviews
- Skype
- Google Hangouts
- Apple FaceTime
- Zoom
Microsoft Skype
Skype is the Kleenex of the video chat world. It’s a cross-platform name that most people have heard of and are pretty likely to have an account with already. Skype is easy to use and has generally high quality audio and voice quality. It also allows screen sharing, but this feature is limited to sharing an entire screen as opposed to a single window (at least in Mac).
Although Microsoft acquired Skype in 2011, the software remains well supported across Windows, MacOS, iOS, and Android. One added advantage of Microsoft’s ownership is that users can now log into Skype with their Microsoft usernames and passwords. Skype is generally free unless you want to use it to call cell phones or land lines outside of the United States, in which case you’ll need to pay by the minute.
Pros
- Most recognized brand in video conferencing
- Easy and mostly free to use
- Well-supported on all major operating systems and mobile devices
Cons
- User registration is required
- Can only share the entire computer screen versus single window
Google Hangouts / Meet
Hangouts is the Skype for G-Mail users. Like Skype, it offers free audio and video conferencing with screen sharing capabilities. However, its screen sharing capabilities are a little bit more robust in that you can select a single window – i.e. just a web browser – versus your entire desktop. On the desktop, Hangouts is accessed best with Google Chrome but is compatible with Explorer, Safari, and Firefox as well. There are apps for mobile platforms.
Another unique feature about Hangouts is its tight integration with Google Calendar. If you’re already using Google Calendar, you should notice that a unique URL for a Hangouts conference is automatically created whenever you add something to your calendar. This integration in addition to your existing G-Mail username makes Hangouts a pretty obvious choice for G-Mail users.
Pros
- Tight integration with GMail and Google Calendar
- Can share an individual window versus your entire screen
- Easy and mostly free to use
Cons
- Must have a Google account
- No dedicated desktop app
- Doesn’t work well on Amazon Fire tablets
Apple FaceTime & Messages
If both you and your student are on Apple devices like Macs, iPhones, and iPads, then Facetime and Apple Chat is probably the easiest option for you as it’s already second nature. However one big draw back is that screen sharing is only available in Messages in Mac OS. This means that you can only share your screen if both you and your student are on a Mac computer like a MacBook or iMac; portable devices running iOS like iPhones and iPads won’t cut it.
Pros
- Second nature for Apple users
- Easy and free to use
Cons
- Not cross-platform compatible with non iOS or MacOS devices
- Screen sharing is only available when both users are on MacOS devices
Zoom
Zoom is unique in this group in that it combines both video conferencing software with a built-in whiteboard. It is quickly gaining popularity among schools and other organizations; with the free services the company is providing to educators during the COVID-19 outbreak, your students may already be using it on a daily basis. It includes a number of education-focused bells and whistles, like a “hand-raising” tool that helps simulate classroom instruction, a built-in whiteboard, and the ability to share video from a second source (such as a document camera).
While Zoom has expanded the functionality of its free Basic plan for educators, independent tutors without a K-12 email address are subject to a 40-minute duration limit for group meetings with 3 or more participants. With that being said, the Basic plan will fit the needs of most private tutors, since there are no limits on one-on-one meetings (and users can always start a new group meeting upon hitting the duration limit). For those who want more features and fewer restrictions, unlimited Pro and Business plans start at $14.99/month.
Pros
- Fully functional on a wide range of devices, including mobile
- Numerous screen-sharing options, with the ability to annotate collaboratively
- Shared whiteboards can be downloaded as an image file
- Only the host needs to be a registered user
Cons
- Free plan places limits on group meetings of 3 or more people
- Sharing multiple screens (or whiteboards) at once is possible, but difficult without a dual-monitor setup

You could use a graphics tablet with any program, probably even Paint / whiteboard app , for actually doing ( write with digital pen ) the math on screen. I teach using a XP-PEN Star G960S https://www.xp-pen.es/product/580.html tablet and OneNote , Zoom .