Congratulations! You’ve registered with Piqosity and are well on your way to making the most of your online 5th Grade Math, Algebra I, or Algebra II course! Below is a step-by-step guide on navigating Piqosity’s math courses that includes both visual aids and instructions for how to use our features. In it, you will learn how to:
- Add a math course
- Take a Mini-Diagnostic Test
- Use lessons to review concepts
- Take unit tests
- Practice using our Adaptive Practice feature
Curious about how to approach our courses for optimal math enrichment, remediation, or test prep use? The below guide walks you through how to do this on a navigational level, but you can learn more about the strategy and processes behind these steps with our user’s guide – coming soon!
Step 1: Add a Math Course
Before we get into the how-to of working on these online math courses, you first need to add a course to your account.
After you register, log in to your Piqosity account. At the top of the page, you will see a teal navigation bar. Access your dashboard (the homepage) by clicking on “Piqosity” on the left side of the navigation bar. (To get your own profile and settings, click your name on the right side of the navigation bar.)
To add your math course, simply:
1. Click on the “Course” button on the teal navigation bar next to “Piqosity.”

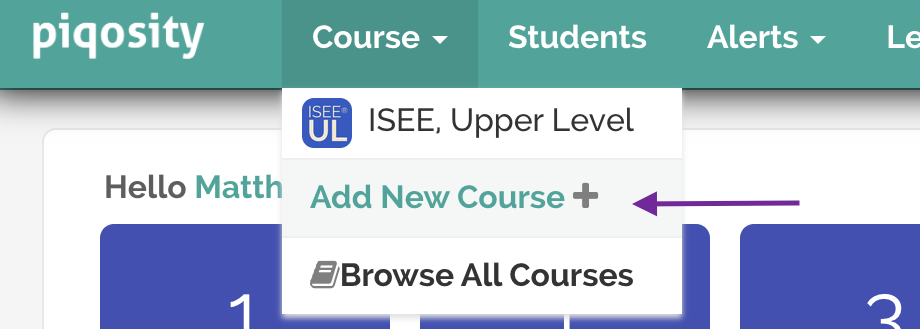
2. After you click this button, you will get a pop-up asking which course you’d like to add. Select the math course that aligns with your needs. This guide will be using Algebra 1 as its primary example – there are very minor navigational differences between Algebra 1 and our other math courses, which we will note as we go along.
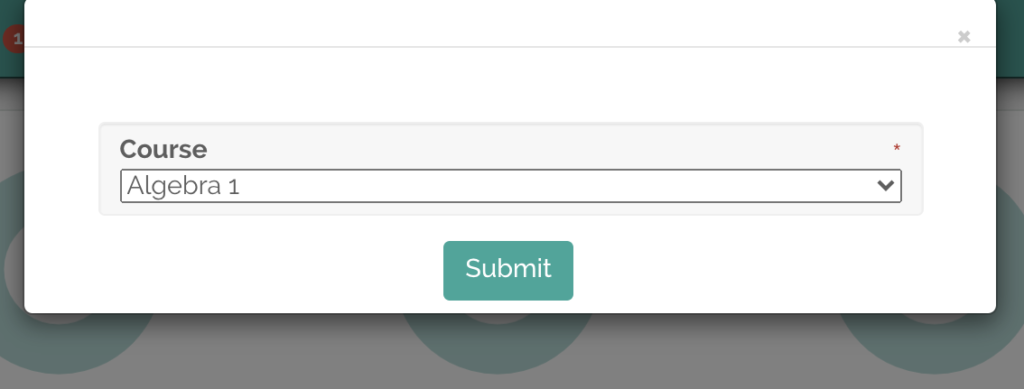
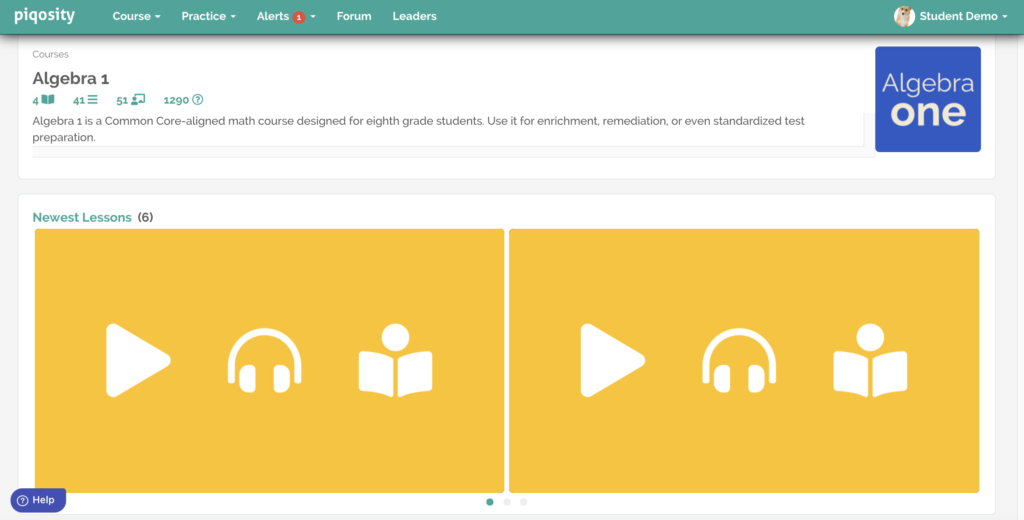
3. Once you’ve added your course, click the “Course” button again and reselect the course you added. A page will load that looks like the one below. This is your course dashboard!
First Glance: Understanding the Course Dashboard
When you open up your course dashboard, you will see a page like the one below. What follows is a basic description of the different components of this dashboard.

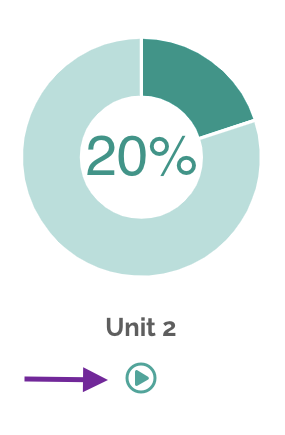
1. The 5 Donuts:
Labeled Algebra 1 and Units 1-4, these “donuts” mark a student’s progress towards completing practice questions in the whole course (the Algebra 1 donut) and in each unit.
Clicking on the play button beneath each donut takes you to an adaptively generated and gamified selection of questions within the selected unit that prioritizes questions that you have not yet encountered or have gotten incorrect before. The Algebra 1 play button takes you to a selection of questions from all of the units, and, for instance, the Unit 3 play button takes you to questions from that unit. This is a variation of our adaptive practice feature.
2. The 5 Bars:
Lessons: Clicking on “Lessons” takes you to the page of lessons for each unit in the course. More on this in Step 3.
Practice: Clicking on “Practice” takes you to an Adaptive Practice setup – more on this in Step 5.
Tests: Clicking on “Tests” takes you to the introductory mini diagnostic test (Step 2) as well as the comprehensive practice tests for each unit (Step 4).
Assignments: Clicking on “Assignments” takes you to the lessons or tests you have been assigned to complete by a tutor or educator.
Review: Clicking on “Review” allows you to view past test results and resume any incomplete practice you may have. We describe this in more depth in Step 4c.
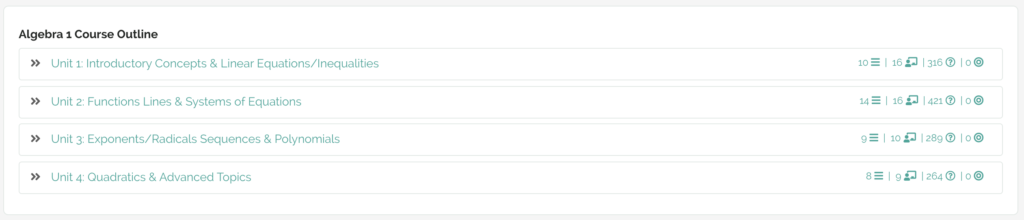
3. The Course Outline:
This outline allows you to access and work through our instructional content on Algebra 1. Here, you can quickly find and select a specific lesson to study from any of the units.
4. Recommended Lessons:
These cards recommend lessons based on your performance in the course. If you struggle in a certain subtopic, it recommends that you look over the lesson for that subtopic.
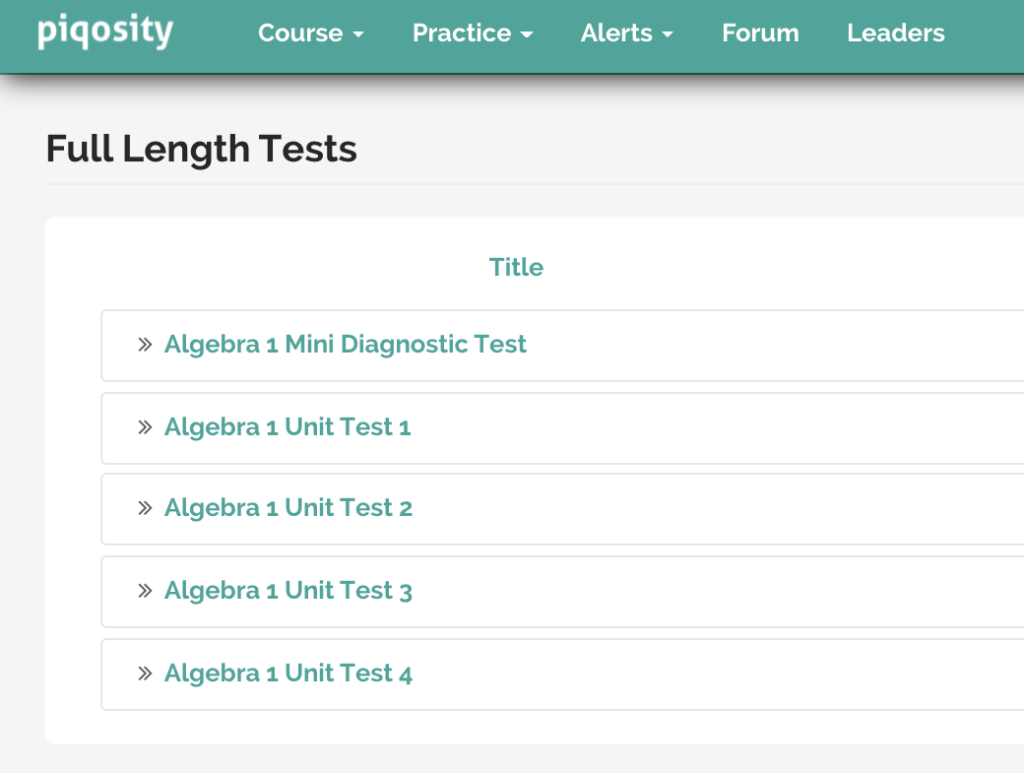
Step 2: Take a Mini-Diagnostic Test
To take full advantage of a Piqosity Math course, students should begin their course progression by completing a mini-diagnostic test. This test includes questions from each lesson covered in the course and serves as a baseline for students to gauge where they are prior to beginning the course.
Step 2a: Access and Complete a Mini-Diagnostic
Start by returning to your dashboard (“Course” > your math course) and navigating to the “Tests” tab.

On this page, you can see the exam for each unit. To begin the comprehensive diagnostic exam, press the yellow “Start” button on the far right of the bar for the “Mini Diagnostic Test”.
Alternatively, you can take a diagnostic test for a single unit by clicking the box for the course’s Mini Diagnostic Test and select “Start” for the unit you wish to test yourself on. This is especially useful if you’re about to start a new unit, so that you can identify your strengths and weaknesses.

You will then be taken to the test page.
The testing interface is the same for the mini-diagnostic tests, post-lesson exams, and unit tests. Refer back to this section if you need a walkthrough of the testing features for any type of test on Piqosity. The following images are from a sample unit-based mini diagnostic test.
The below page is the introduction to the exam you’re taking. It features a print option, a description of what it will be testing, and your time limit.
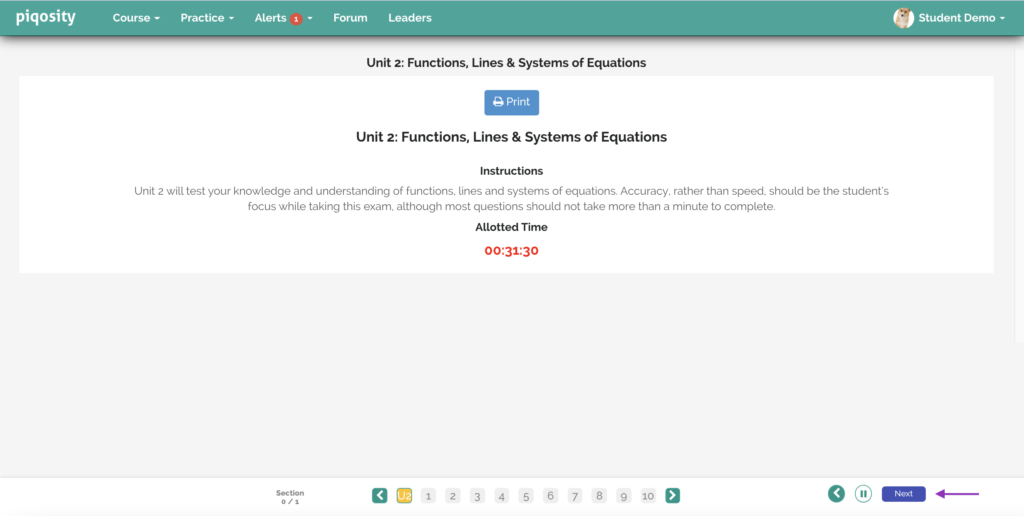
Select the dark blue “Next” button on the bottom right to begin the exam.

Each question page has several components:
- The timer next to the question number shows how much time you’ve spent (in seconds) on that particular question.
- The “Mark” button next to the question timer allows you to highlight that question if you wish to return to it at a later time.
- Answer choices (A, B, C, D, sometimes E) are grey until selected, which then darkens them.
- The “Eliminate” button next to an answer choice allows you to seamlessly rule out answer choices that you determine are incorrect, so that you can use process of elimination and focus on the choices that you believe are more likely to be correct.
- A scratch work page is provided beneath the answer choices, which you can write on to help you work through the problem. This feature is especially useful for tablet or mobile device-users. You are able to see your scratch page for a question when you complete and review the exam.
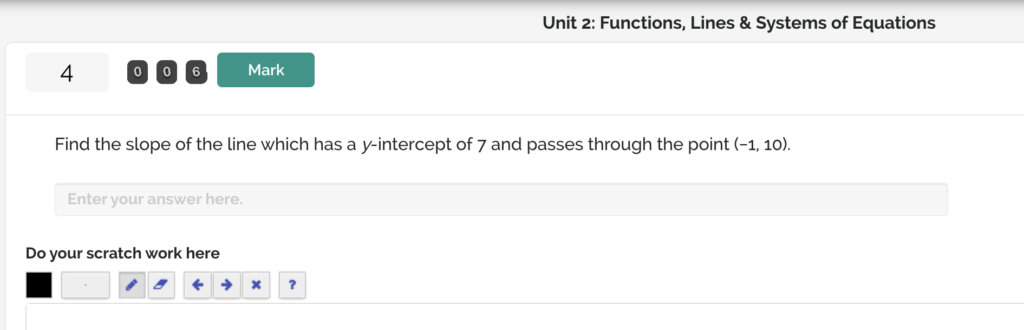
Exams are mostly multiple-choice, but they also have free response questions. Simply type your answer into the field.
![]()
The bottom bar of the test also has several components:
- The timer on the bottom left shows the remaining time you have for the exam.
- The question numbers allow you to select a specific question. The colors of the question numbers indicate the question’s status:
- When it is light grey, it is unanswered
- When it is dark grey, it has been answered.
- When it is teal, you are currently on that question page.
- When it is red, you have marked it.
- The green arrows on either side of the question numbers allows you to navigate to the next or previous ten questions (so, navigating from questions 1-10 to questions 11-21).
- The pause button allows you to take a break during the exam, which pauses the timers.
- The blue “Next” button takes you to the next question.
Once you have completed the last question, you will see the submit page.
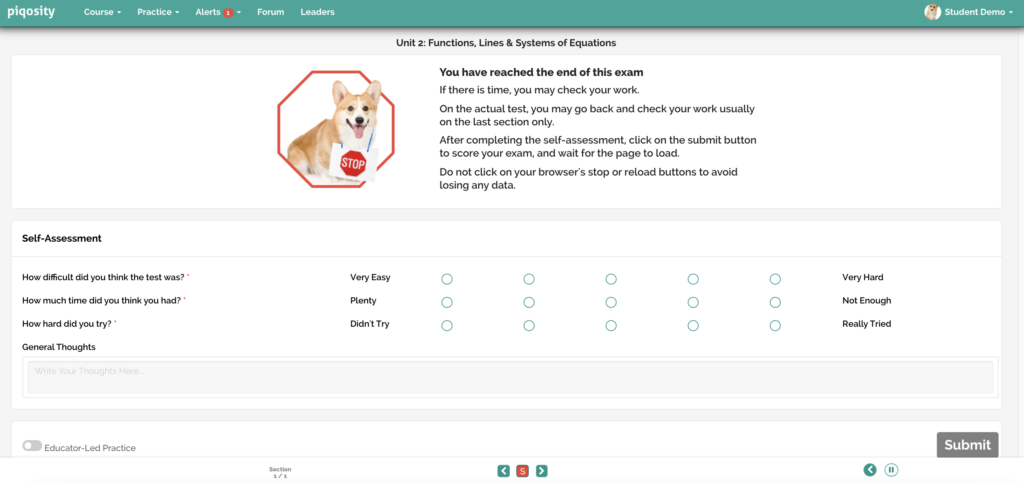
This page provides you a last chance to go back and double check your answers before submitting.
After checking your answers, fill out the self-assessment survey on your testing experience. Then, the grey “Submit” button will turn red and you will be able to submit your answers.
Step 2b: Review Your Results
Once you have submitted your work, you will be taken to the results page to see how well you did.
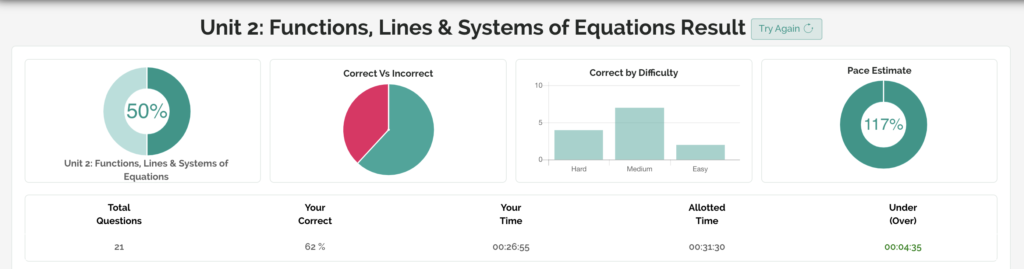
From left to right:
- The donut on the top left shows your overall accuracy for the course or unit. If you took a comprehensive mini diagnostic, it shows your accuracy for the whole course – if you took a unit-based mini diagnostic, unit test, or post-lesson exam, it shows your accuracy for that unit in particular.
- The pie chart next to it shows your correct/incorrect ratio.
- The chart to the right of that shows the number of questions you answered correctly based on their difficulty level.
- The final donut shows your pace – a higher number means that you finished the test more quickly.
Below that row of information is a second row that shows your percent correct (your “grade” out of 100%), the time you took to complete the exam, and the amount of time you used under or over the allotted time.
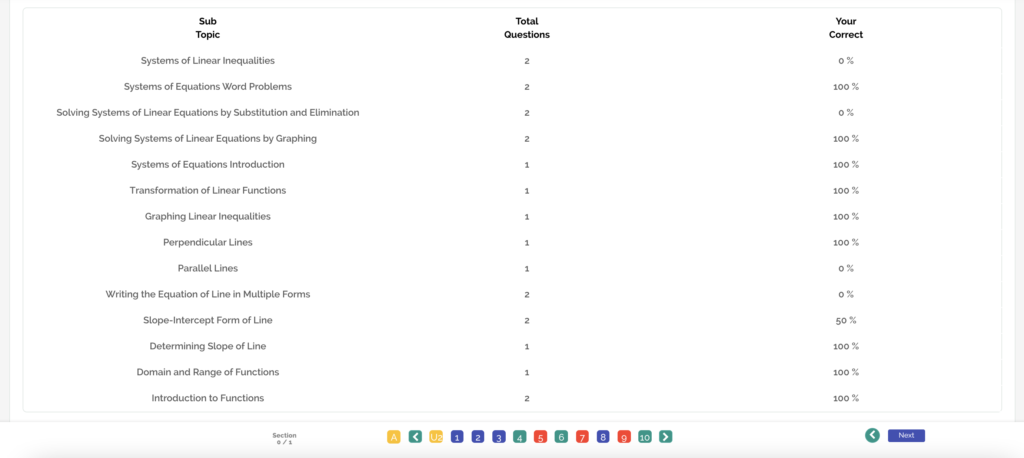
Then, you are shown the list of subtopics that were quizzed, how many questions appeared from each subtopic, and your percent correct for each subtopic.
The buttons for each question are still at the bottom of the page – the colors of the question numbers indicate the question’s status post-exam:
- When it is teal, it is correct and answered in a timely manner.
- When it is dark blue, it is correct but answered too slowly. (More on timing for questions below.)
- When it is red, it is incorrect.
At this point, you should:
- Note which subtopics you struggled with and review a lesson on that topic (more on lessons below).
- Click any of the question numbers at the bottom to view the correct answer and an answer explanation. Use these to understand why you got the question right or wrong. The question pages of a finished test also show how much time you spent on that particular question, eliminated answers, and the scratch page.
As indicated by the question number “5” being red at the bottom of the review page, this student answered question 5 incorrectly:
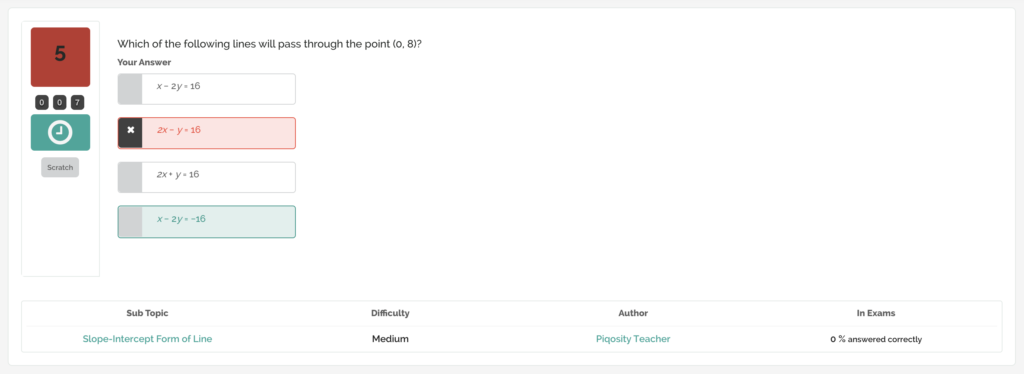
The review page of a question includes:
- A timer with the number of seconds you spent on the question (below the question number).
- A clock symbol below the timer that turns red when you’ve spent too much time on the question.
- A “Scratch” button that lets you view your scratch page.
- Your incorrect answer (in red) and the correct answer (in green)
- The subtopic and difficulty of the question, as well as your accuracy with other questions of the same subtopic.
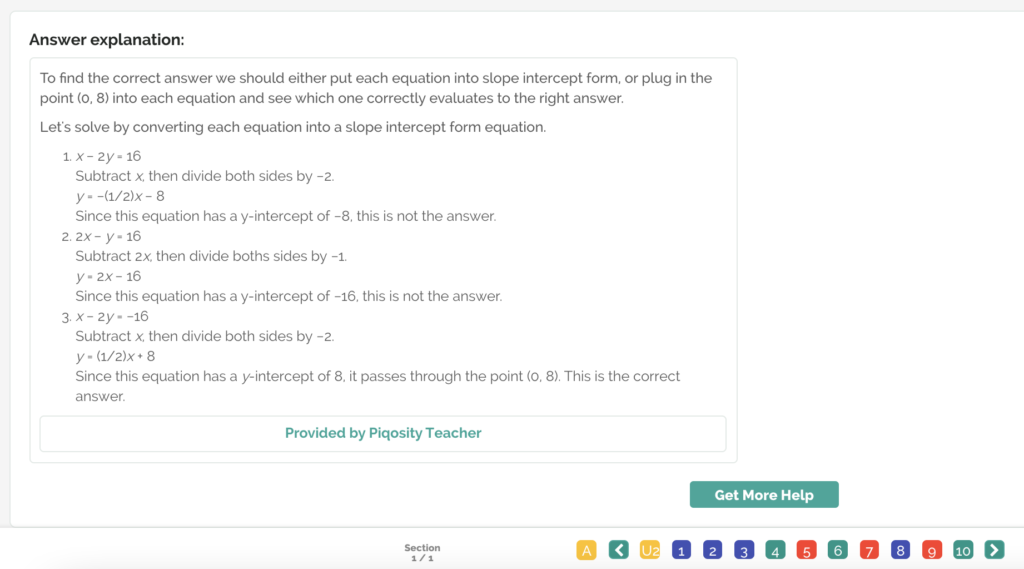
Underneath the question on its review page, a thorough answer explanation is provided by the Piqosity team. If you still do not understand the question, select the “Get More Help” button.
This will open this question page in a new tab – scroll down and you can select “Ask Question” and type in your query.
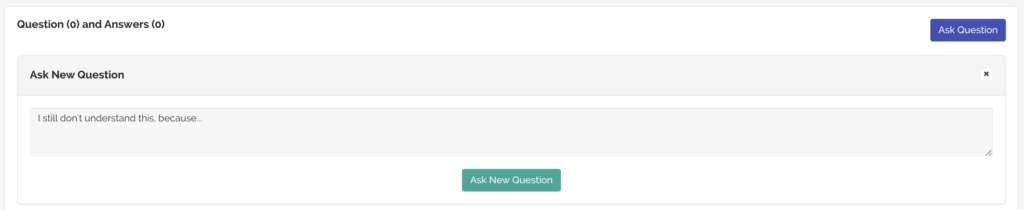
If other students have asked about this question, their queries and educators’ answers will appear below this field.
Your results give you a good idea of which lessons you should focus the most on.
Access and resume, review, or retake any of your past tests by navigating to the Review page – more on this in Step 4c.
Step 3: Use Lessons to Review Concepts
To take full advantage of your math course, work through each of the lessons in order. The Piqosity team has created thorough lessons to refresh and enrich students’ knowledge and understanding of math curriculums. Lessons cover a wide range of topics within each of the four units that help in both refreshing and enriching students’ memory and understanding of math topics.
Step 3a: Access Lessons
First, return to the dashboard for your math course by clicking “Course” in the navigation bar, then your math course. To access the lessons, either click the “Lessons” button in the bar underneath the donuts or click on the “Course Outline” underneath the “Lessons” and “Practice” buttons.
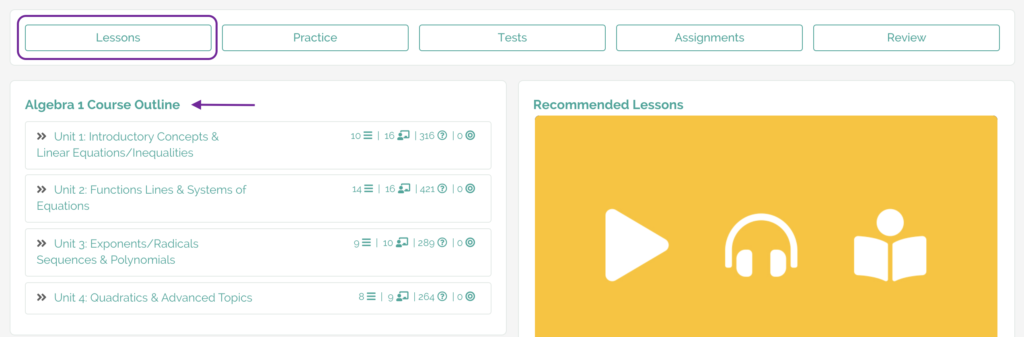
You will be taken to the Lessons page for the course. This page has a brief description of the course’s lessons and quick-access icons for the newest lessons.
Scroll down to access the course outline.
Click the box surrounding Unit 1. A drop-down list of all the unit’s lessons will appear.
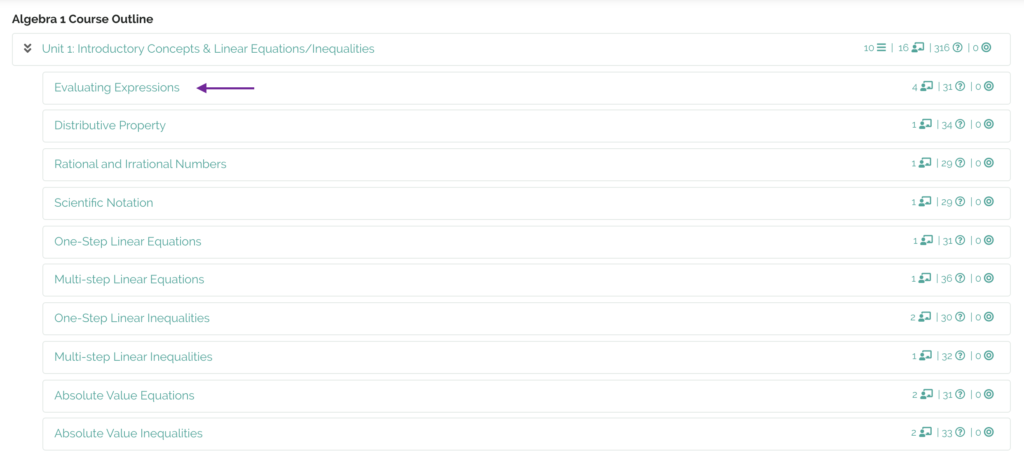
Notice the target icon on the rightmost side of each lesson or unit. This is the accuracy for each lesson/unit. As you work through questions throughout the course, the zero shown above will update to match your accuracy for each unit or subtopic.
Select the first lesson in Unit 1 on Evaluating Expressions. A page will appear showing the objective of the lesson and a link to it.
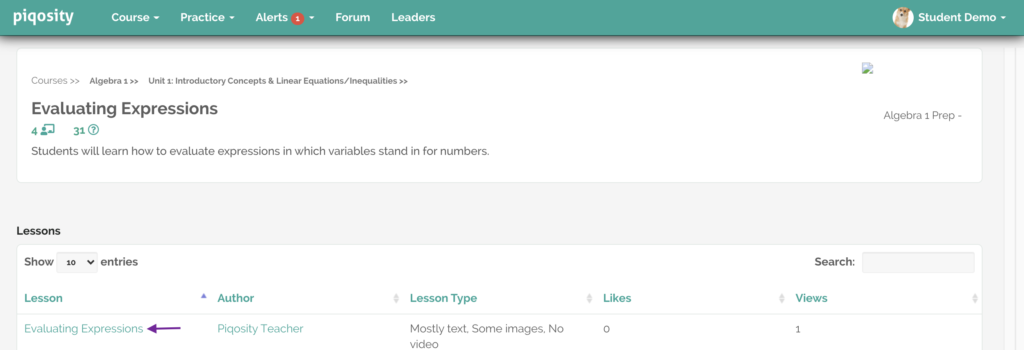
Select the link to access the lesson.
Alternatively, stay on the dashboard page and click on the arrows (or the empty space next to the category name) in the Course Outline box to reveal a drop-down menu with each lesson. From there, select Unit 1’s first lesson to directly access it.
Step 3b: Read a Lesson
Piqosity’s math lessons are full of detailed explanations, clear definitions, and real examples that work through each step of the process for solving problems.

This is the lesson! Continue reading to learn and understand these concepts. Taking notes is recommended to help your focus and memory.
Below is what the page looks like when you reach the end of a lesson.
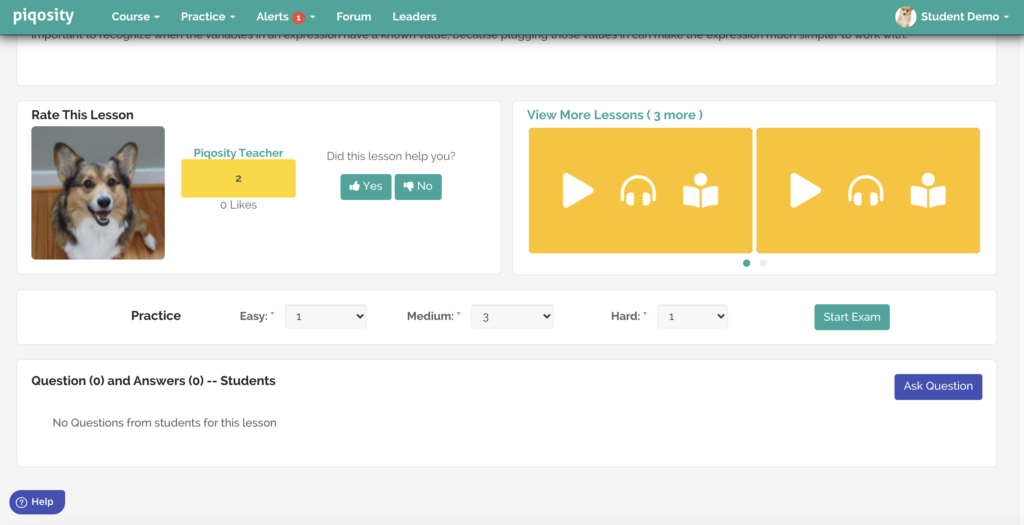
Let us know if it helped answer any of the questions you had or clarified any concepts you were unsure about by answering the “Did this lesson help you?” query!
You also have the option to ask a question if you are still confused about any concepts after reading the lesson. This function is similar to asking a question when reviewing a test.
Step 3c: Lesson Exams
At the end of a lesson, select the teal “Start Exam” button at the bottom of the page to test your understanding. You have the option to select how many questions of each difficulty you’d like. A brief quiz will pop up to test you on the concepts discussed in this lesson.

The interface for the exam is the same as in the Mini-Diagnostic test – to review the various functions you can access, refer back to Step 2a.
Remember to review your results at the end of the exam. Go through the answers and read the answer explanations, especially if you got the wrong answer or guessed the correct one. Submit a question if you need a different explanation, and review the lesson for instruction on the concepts you missed. You can revisit your results in the review page – more on this in Step 4c.
Step 4: Take a Unit Test
After going through the lessons for an entire unit, test your understanding by taking a unit test. Each of our units has a comprehensive exam that will affirm your understanding or highlight lessons you need to review.
Step 4a: Access the Unit Tests
Navigate back to your course dashboard by clicking “Course” in the top navigation bar, then your math course.
Then, access the unit tests by selecting the “Tests” button in the bar underneath the donuts.

The list of all full-length tests will appear.
If you’ve just finished the lessons for the first unit, select the yellow “Start” button on the far right side of the Unit Test 1 for your course.
Step 4b: Complete a Unit Test
Unit tests are full-length exams that comprehensively test your knowledge of a certain unit. The interface of test-taking for units is the same as test-taking for the Mini-Diagnostic exam and for post-lesson exams.
Remember to double-check your answers before submitting.
Step 4c: Review or Resume your Tests
Reviewing a unit test has the same interface as reviewing your Mini-Diagnostic Test.
You are able to access the results from any previously completed exam, resume any incomplete exams, or retake exams by navigating to the Review page.
To do so, return to your course dashboard (“Courses” > your math course).
In the bar beneath the donuts, select the “Review” button.

You will be directed to the Review page.
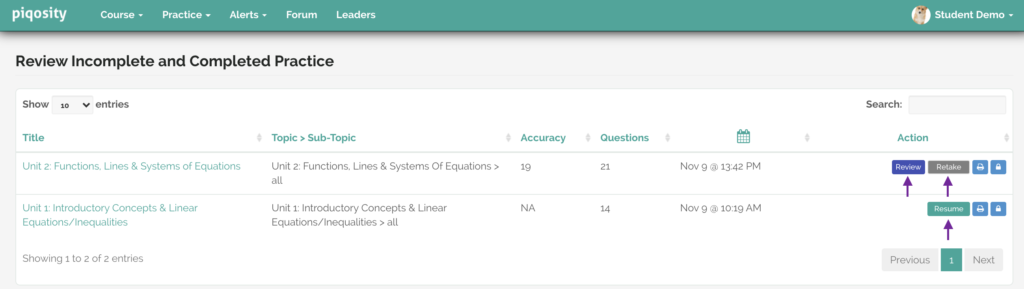
Here, you can see all of the exams you’ve started. You have the option to:
- Review the results of a completed exam by clicking the blue “Review” button.
- Retake a completed exam by clicking the grey “Retake” button.
- Resume an incomplete exam by clicking the teal “Resume” button.
- View your overall accuracy for each practice/exam by viewing the score underneath the “Accuracy” header.
Step 5: Use the Adaptive Practice Feature
Once you’ve finished a unit, reviewed your work, and refreshed your knowledge with lessons, all that’s left to do is to practice and move on to the next unit!
Adaptive practice is Piqosity’s quiz mode that intelligently selects an assortment of questions based on your experience in units, post-lesson exams, and past adaptive practice quizzes. It prioritizes questions that you haven’t yet answered or that you haven’t answered correctly; this practice tool targets your weaknesses to help you improve your knowledge of math.
Adaptive practice is perfect for when you wish to take a break from working through lessons, have a shorter period of time available to work on math, or want to dive more in-depth into any particular area of math.
One way to quickly access gamified adaptive practice over a particular topic is to simply click the “play button” underneath a unit’s donut on the course dashboard.
However, this option doesn’t allow you to customize your practice experience.
To access the full potential of adaptive practice, navigate back to your math dashboard (click “Course” > your math course). Select the “Practice” button in the bar underneath the donuts.

This will bring you to the “Adaptive Practice Setup” screen, where you can select the unit and lessons you would like to work on. You’re able to choose how many easy, medium and difficult questions you would like.
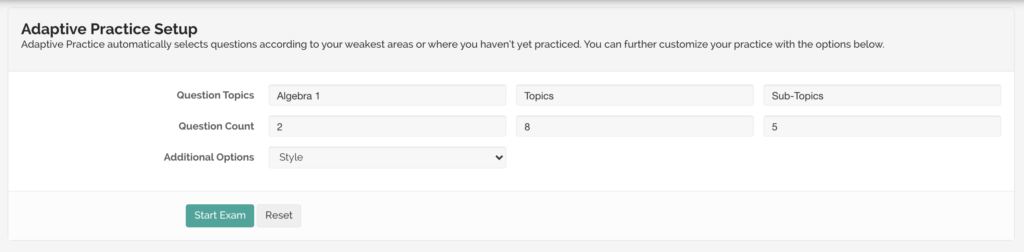
You can also select the “Style” of the test you would like. Currently, we have regular-style practice tests and a “Gamified” style, which is more responsive between questions and more engaging to use. Once you are ready, select “Start Exam”.
When you submit your adaptive practice, review your work – the review interface is the same as reviewing an exam. If you’d like to return to the results at a later date, remember that you can navigate to the “Review” tab from the dashboard.
Step 6: Repeat!
Remember to prioritize any instruction you have from a tutor or other educator on what to do next – they may assign you work from time to time, which you can find by navigating to the “Assignments” tab.
Otherwise, move on to the next unit and:
Review Lessons > Take Unit Exams > Practice > Repeat!
Proceed in the order of how the units are currently structured to receive a well-rounded curriculum that corresponds to a typical math classroom curriculum. When you’re finished with the Unit 1 exam, move on to the Unit 2 lessons!
Need Help With Any of Piqosity’s Courses?
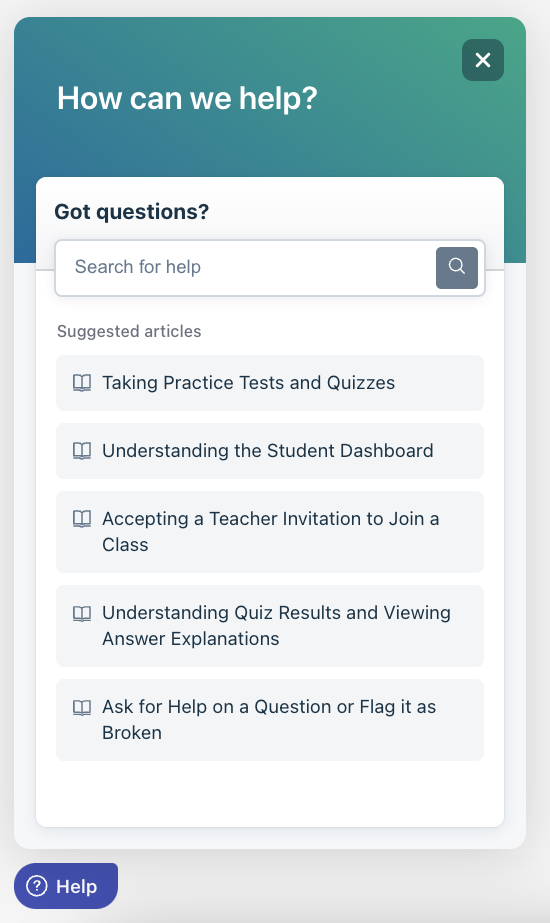
Should you require assistance while working on Piqosity, select the “Help” icon to view frequently asked questions or reach out to our office via phone or email! Our team is here to help make your experience as seamless and straightforward as possible.
Email: [email protected]
Phone: +1 713-234-6098
Using one of our ELA courses? We’ve created a navigation guide for our English courses, too!
